Lab Notes
How to set up a Mac for Web Development

For one reason or another I’ve found myself setting up a fresh web development environment on a new or clean mac multiple times since last summer. I’ve put together a list of the basic steps to setup a fully functional professional web development environment for my own reference, but you might find it a useful starting point too. The goal here is to have you up and running with a fully functional dev environment on your mac within about 4 hours.
This is the base level for setting up a new mac to use for professional web development. I’m assuming that you will be developing primarily with JavaScript and PHP, like most web developers. Other configurations are, of course, possible. I spend most of my time working with Laravel, Vue.js and WordPress so this is the ideal setup for me. Your mileage may vary.
First things first – let’s see if the mac is ok.
For this exercise I’m setting up the dev environment on a brand new 2020 iMac, pre-installed with MacOS Catalina (which, annoyingly, was already out of date when the mac was delivered). Its worth spending a while poking around the initial setup for future reference, and to help with some troubleshooting scenarios later on in the mac’s life. You can skip this part if you like as it may not apply to all machines. In this instance there were a few things wrong with it out of the box.
This mac is mostly fine but there a few problems worth noting:
- Content caching doesn’t work
- Downloads being externally managed – I have no idea why this is so, I removed the customisation.
- First attempt to download and install Big Sur failed with a ‘gateway’ error.
There’s no real solution to the content caching that’s worth pursuing. The work-around for the failed update is to disable gatekeeper:
sudo spctl --master-disableThen make sure to re-enable when you’re all done. According to some People From The Internet updating the OS from the App store works better than via software update but I don’t know if that’s true.
Browsers
Install Firefox dev edition to use as your main browser. It has some nice dev features and the containers feature is very useful when you’re jumping between accounts and test sites.
https://www.mozilla.org/en-US/firefox/developer
You’re also going to need to install Google Chrome – you’re going to need to test your stuff on the browser that has 68.15% of desktop market share (Nov 2020). Just maybe keep it for testing only, unless you especially love using it.
https://support.google.com/chrome/answer/95346?co=GENIE.Platform%3DDesktop&hl=en
There is an argument that you should install the new MS Edge for testing too. If you really want to.
https://www.microsoft.com/en-us/edge
Terminal
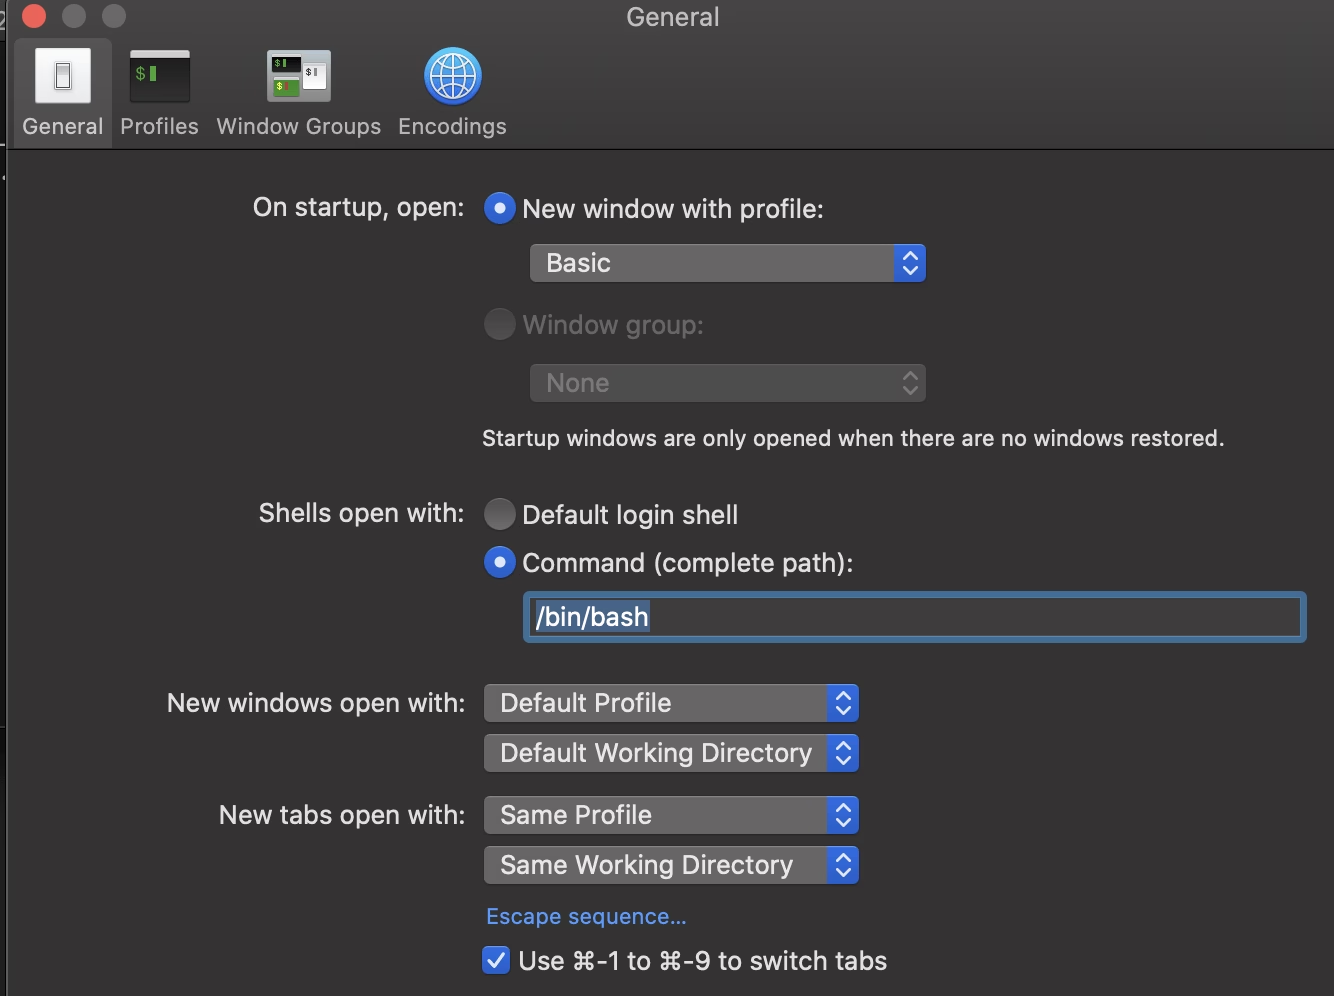
Go into terminal preferences and set preferred shell to bash. I mean you can carry on with zsh if you want to, but I’m comfortable with bash and don’t see any particular reason to change right now.

Update the shell path in Terminal preferences.
I spend a lot of time on the command line, and I find the default themes to be hard on my eyes after a while.
$ mkdir ~/Plugins && cd Plugins
$ git clone https://github.com/lysyi3m/macos-terminal-themes
Follow the instructions here: https://github.com/lysyi3m/macos-terminal-themes
Pick a theme that you’re happy to look at for 8 hours a day. I like ‘Broadcast’ myself 🙂
Now you’ll want to set up your bash profile with some useful aliases and functions to speed things up. Add some or all of these depending on your tastes.
$ nano ~/.bash_profile
#########
# Colours
#########

export PS1="\[\033[36m\]\u\[\033[m\]@\[\033[32m\]\h:\[\033[33;1m\]\w\[\033[m\]\$ "
export CLICOLOR=1
export LSCOLORS=ExFxBxDxCxegedabagacad
alias ls='ls -GFha'

#########
# Aliases
#########

#saves wear on / key
alias www='cd ~/Sites'

#edit the hosts file
alias hosts='sudo code /etc/hosts'

#too lazy to type git
alias push='git push'
alias pull='git pull'

#web shortcuts (examples)
alias bitbucket='open https://bitbucket.org'
alias drive='open https://drive.google.com/drive/my-drive'

#laravel
alias art='php artisan'
alias artisan='php artisan'

#npm
alias witch='npm run watch'
alias serf='npm run serve'
alias prod='npm run production'

#open this file
alias bosh='code ~/.bash_profile'

###########
# Functions
###########

#open default web browser and point to url specified
web() { open https://"$1"; }

#open bitbucket at named repository
bbuck() { open https://bitbucket.org/<your-org>/"$1"; }

#go to directory of given project
grobe() { cd ~/Sites/"$1"; }

#go to www directory and open in vscode :)
co() {
    cd ~/Sites/"$1"
    code .
}

jump() {
    cd ~/Sites/"$1"
    code .
    npm run watch
}

#git add and commit while sparing fingers and keyboard.
gurt() { git add --all && git commit -m "$*"; }

#adds wp page with multi word titles enabled
wppage() { wp post create --post_type=page --post_title="$@"; }

#adds wp custom post type. Add args like 'custom post type name' then 'custom post type title'
wpcreate() { wp post create --post_type="$1" --post_title="${@:2}"; }

#see who's contributed the most to a project :)
whodid() { git log --shortstat --author "$1" --since "100 weeks ago" --until "today" | grep "files changed" | awk '{files+=$1; inserted+=$4; deleted+=$6} END {print "files changed", files, "lines inserted:", inserted, "lines deleted:", deleted}'; }

#put composer on the path, mostly for laravel
export PATH="$PATH:$HOME/.composer/vendor/bin"

#adds tab completion
if [ -f $(brew --prefix)/etc/bash_completion ]; then
    . $(brew --prefix)/etc/bash_completion
fi

#display current git branch in terminal
parse_git_branch() {
    git branch 2>/dev/null | sed -e '/^[^*]/d' -e 's/* \(.*\)/ (\1)/'
}
export PS1="\u@\h \[\033[32m\]\w\[\033[33m\]\$(parse_git_branch)\[\033[00m\] $ "

# remove annoying zsh nag
export BASH_SILENCE_DEPRECATION_WARNING=1

#mjml
export PATH="$PATH:./node_modules/.bin"
Node.js
Download it from the website (yes really)
Ignore what you see on stack overflow and elsewhere on the internet about using node version managers, that’s no longer necessary.
Choose and download the LTS version – there isn’t any benefit for the average web dev from using the unstable version so don’t be a hero. Follow the instructions to install.
The installer will tell you to make sure that /usr/local/bin is in your $PATH. You can check as follows:
echo $PATHExpected output:
/usr/local/bin:/usr/bin:/bin:/usr/sbin:/sbinCheck to see if node and npm installed ok:
$ node --version

v14.15.4

$ npm --version

6.14.10
Lets check some other pre installed software to see what came in the box:
$ python --version

Python 2.7.16

$ php --version

PHP 7.3.11 (cli) (built: Jun  5 2020 23:50:40) ( NTS )

Copyright (c) 1997-2018 The PHP Group

Zend Engine v3.3.11, Copyright (c) 1998-2018 Zend Technologies

$ ruby --version

ruby 2.6.3p62 (2019-04-16 revision 67580) [universal.x86_64-darwin19]
We don’t want to use these preinstalled versions in our work, so we’ll use homebrew to install the versions we want later.
Composer
For PHP development you are going to need composer. Anyone who tells you different probably works on one project every 5 years and doesn’t know what they’re talking about.
curl -s https://getcomposer.org/installer | php
sudo mv composer.phar /usr/local/bin/composer
Git/Xcode
Check
$ git -—versionThis will most likely prompt you to install Xcode command line tools first. Do it. It will take a while and may fail. If it fails get the tools from the website.

Xcode command line developer tools install prompt
So now you should get
$ git --versiongit version 2.24.3 (Apple Git-128)
Set up your global config following the instructions here.
https://git-scm.com/book/en/v2/Getting-Started-First-Time-Git-Setup
$ git config --global user.name 'Your Name'

$ git config --global user.email you@example.com

$ git config --list
Homebrew
Most of what we install from here will be via Homebrew – instructions below:
don’t forget this if using bash on an M2 chip:
echo 'eval "$(/opt/homebrew/bin/brew shellenv)"' >> ~/.bash_profile
Php
brew install phpMysql
I recommend to not use Dbngin as recommended in the Laravel Valet docs (see below) – it’s a lure for a paid product and probably not necessary. Just use Homebrew.
brew install mysqlWorked first time for me this time – however horrible config issues can sometimes ensue but I can’t document this time because they didn’t happen :).
Valet
Follow the instructions on the Laravel website.
https://laravel.com/docs/8.x/valet#installation
$ mkdir ~/Sites
$ cd Sites
$ valet park
If you want to tell valet to use another version of php you can do so like so:
valet use php@7.4One thing to note – if you have projects who’s public directory is nested in a subfolder (all my WordPress projects for example) the latest versions of Valet will not find the linked subfolder by themselves any more. The way around this is to create a custom valet driver.
So in my case, where I have run
valet parkin /Sites and my WordPress projects all have their public directories in a subfolder called ‘dist’ within each project folder I needed to save the following file as ~/.config/valet/Drivers/CustomWordPressValetDriver.php
https://gist.github.com/danieldevine/9a1e7c23872103d191ee22990a2d5815
Now you have a functioning dev environment that will work for Laravel and WordPress and Drupal. You almost certainly don’t need Vagrant, Xampp, Kubernetes or Docker unless your website is doing something special. You can add complexity to your environment over time if you really want to.
Laravel
You can install Laravel itself by following the instructions here:
https://laravel.com/docs/8.x/installation
Wp Cli
If you work with WordPress this is essential.
https://wp-cli.org/#installing
Sequel Ace
A fast and easy to use GUI for viewing and/or working with your MySQl databases. Replacement for the stagnant Sequel Pro.
https://github.com/Sequel-Ace/Sequel-Ace
Mailhog
Makes testing and debugging emails relatively pleasant.
$ brew install mailhog$ brew services start mailhogVue Cli
Instructions on how to set up “Standard Tooling for Vue.js Development” here:
If you get permissions errors following the instructions in the docs, install as super user.
$ sudo npm install -g @vue/cliVSCode
Pretty much the default code editor, can fo pretty much anything you need it to for web development.
Install from the website:
https://code.visualstudio.com/docs/?dv=osx
Install command line helpers:
https://code.visualstudio.com/docs/setup/mac#_launching-from-the-command-line
Some recommended extensions:
- Atom keycap
- Auto Close Tag
- Auto Align (bladnman)
- DotEnv
- Formatting Toggle
- Git Blame
- GitLens
- Php cs fixer
- Php DocBlocker
- Php Intellephense
- Prettier
- SCSS Formatter
- Trailing Spaces
- Vetur
- Material Synthwave (theme)
- Material Icon Theme
Whichever editor you use, I recommend installing Fira Code as your font of choice.
So there you have it – a fully functioning web development environment on your mac which is enough to develop most projects. This isn’t to say you shouldn’t or won’t add to the above, but its a solid start. Enjoy breaking things with your new tools.


